Showing posts with label tutorial. Show all posts

Friday, May 27, 2016

Wig styling tutorial: Flower princess braid buns ♡


Moi ihanaiset! ♡
Vuorossa on pieni peruukki tutoriaali. Keväällä ja kesällä on aina kaikki kukkajutut aina esillä, no se on vain luonnollista, kun kaikki ulkona herää jälleen eloon, kasvit kasvavat ja kukat kukkivat. Kirsikankukat meni jo, mutta nyt kukkii omenapuut. Ihanaa! Oon niin innoissani luonnosta ja kävellytkin metsässä tosi paljon.

Mulla on ollut tämä Gothic Lolita Wigs peruukki jo aika kauan, voit kurkata arvostelupostauksen vuosien takaa täältä. Nykyään synteettiset, eli keinokuituiset peruukit on todella korkealaatuisia, ne kestää harjausta, pesua ja lämpökäsittelyä. Niitä voi siis ajatella melkein omiksi hiuksiksi, huom, melkein. Peruukkien kanssa voi tehdä kampauksia, ei tarvitse vain tyytyä siihen alkuperäiseen stailaukseen. Monella voi vielä olla tällaisia ponihäntäperuukkeja kaapeissa, mitkä oli muodissa joskus ja tällä tutoriaalilla voit saada hieman uutta pirteää ilmettä.


Hello lovelies! ♡
It's time for a little wig tutorial. In spring and summer all kinds of flower thingies are always in style, well it's just natural when everything outside comes to life, plants are growing and flowers blooming. Cherry blossoms are gone already, but now it's time for apple tree blossoms. I love it! I'm so excited about nature and have been walking in the woods a lot.


I've has this Gothic Lolita Wigs wig for a long time now, you can g see the review post from way back years ago in here. Nowdays synthetic wigs are really high quality, they can handle brushing, washing and are heat resistant. They can almost be thought as your own hair, well, almost. You can do hairdos with wigs, don't have to just settle for the original styling. Many can still have these kind of ponytail wigs in their closets, which were in fashion at some point and with this tutorial you can get a little bit of fresh new look.

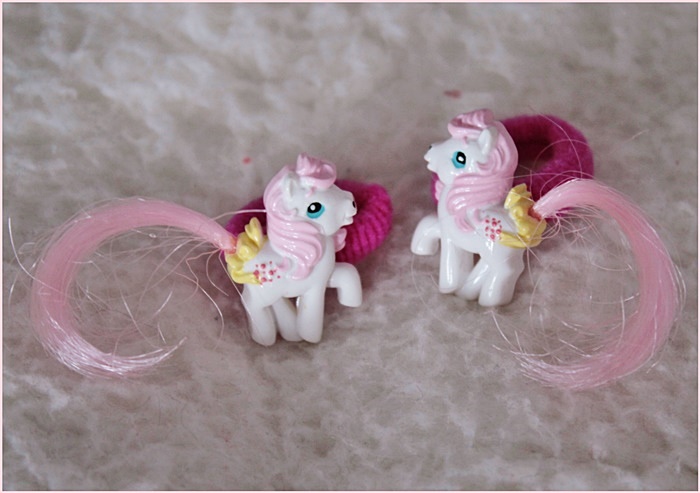

Tarvitset näitä  ♡  You'll need these


Peruukki ponihännillä ~ A wig with ponytails
Söpöt ponnarit ~ Cute hairbands
Hiuspinnejä ~ Hairpins 
Kukkaklipsejä ~ Flower clipons


Peruukin stailaus  ♡  Wig styling

1. Harjaa peruukkisi selväksi, suosittelen tangle teezeriä.
Ohjeet takkuisemman peruukin pikahuoltoon kuvina tai videona.

1. Brush your wig so it tangle free, I recommend tangle teezer.
Quick wig upkeep instructions for a more tangled wig in pictures or video.

2. Jaa peruukin hiukset kahteen noin samanpaksuiseen osaan ja letitä perus kolmen osion letti. 
Lopuksi laita kiinni söpöllä ponnarilla, kannatta katsoa, että mahdollinen koriste tulee eteen.
Tee letit molemmille puolille.

2. Divide the wig hair into two fairly equal parts and make a simple three strand braid. 
Secure the end with a cute hairband, you might wanna see that the possible deco places in the front.
Make braids for both sides, twin braids.

3. Laita harjatut ponihännät kiinni peruukkiin, sellaiselle kohdalle mikä tuntuu hyvältä.
Ponihäntäklipsuilla saa muuten peruukin pysymään tosi hyvin paikallaan.

3. Put on the brushed ponytails to the wig to a place that feels good for you.
By the way, the ponytail clips are a great way to secure the wig onto staying in one place.

4. Letitä ponihännät samalla tavoin, kuin tehtiin peruukille.
Ponnarit on sitä parempi, mitä maastoutuvampi se on.

4. Braid the ponytails same way as we did on the wig base.
The more camouflage hairbands the better.
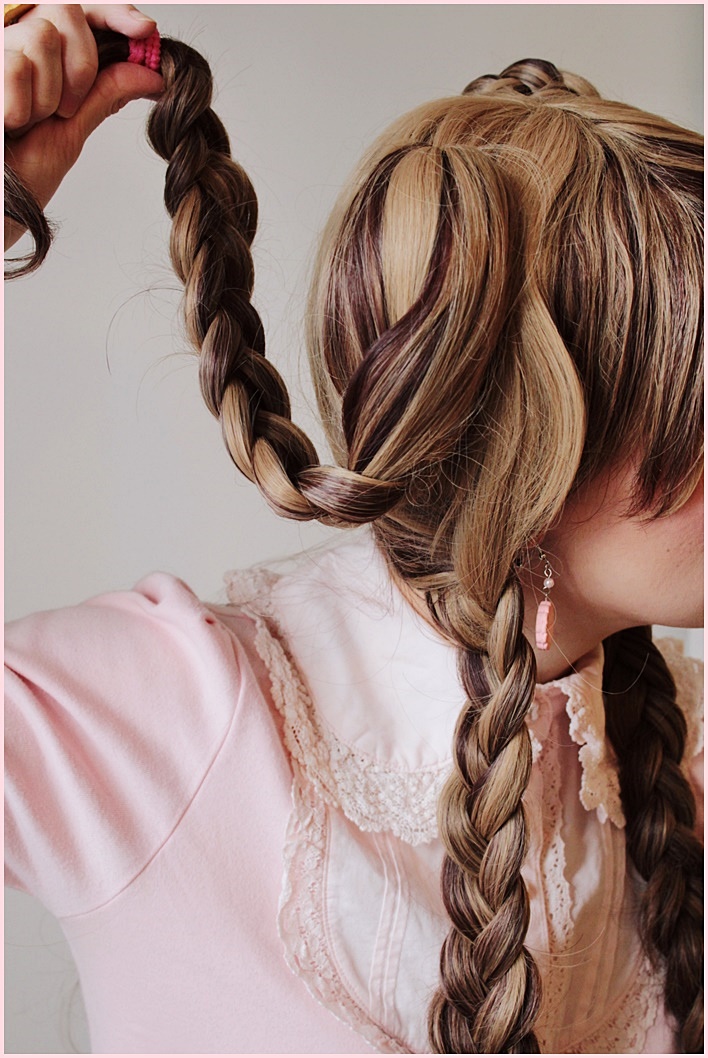
5. Kiedo letti ponihännän klipsun ympärille, aloittaen vetämällä se takakautta ja ylhäältä eteen. 
Huomioi, että peruukin pituus voi vaihdella ja kannattaa kokeilla toiseen suuntaan, jos tämä ei toimi.
Varo kääntämästä lettiä.

5. Tie the braid around the ponytail clip, starting from the back and from the top to the front.
Note, that the length of the wig can vary and you should try the other way around, if this doesn't work.
Be careful not to twist the braid.

6. Kiedo letti loppuun asti ja kiinnitä pinneillä. Itse käytän ns hengettömiä pinnejä, mitkä sopivat hyvin nutturakampauksiin. Näitä on jäljellä mun kilpatanssi-ajoilta. :)
Laita vähintään yksi pinni jokaiselle sivulle, eli yhteensä neljä.

6. Tie the braid all the through and secure with hairpins. I use these kinds of pins, not sure what they are called in English, but they are great for hairbuns. Let me know if you know the name. I got lots of left from the time I did ballroom dancing. :)
Place at least one hairpin to each side, four all together.

7. Viimeisenä, muttei vähäisimpänä: asusta kukkasilla! ✿

7. Last, but not least: accessorize with flowers! ✿ 


Peruukkeja voi asustaa lähes millä tahansa! Niiden ei tarvitse olla edes oikeita hiusasusteita. Päähän voi laittaa esimerkiksi kaulakoruja, joulukoristeita, huiveja, sulkia, klipsuja, korvakoruja, sisustuselementtejä, leluja.. Asustamisen mielikuvituksella ei ole rajaa! ♥

Tämä kyseinen ponihäntäperuukki on GLW vanhempaa mallia, joten sitä ei ole enää saatavilla. Kaupalla on kuitenkin uudistetumpi veriso: Baby Dollight ja sitä löytyy tässä Choco-Latte värissä ja monessa muussa. Gothic Lolita Wigs;illä shoppaillessa kannattaa muistaa käyttää mun alekoodia FRILLY10. 


Wigs can be accessorized with almost anything! They don't even have to be real hair accessories. For example you can put on your head necklaces, christmas ornaments, scarfs, feathers, clipons, earrings, interior decorations, toys.. There's no limit for your imagination when it comes to accessorizing! ♥

This particular ponytail wig is an older design from GLW, so it is not available anymore. The store anyhow has a newer version: Baby Dollight and it can be found in this Choco-Latte color and in many others. When shopping at Gothic Lolita Wigs you might wanna remember to use my discount code FRILLY10.


Tästä muuten tulee hieman mieleen folk- ja kansallispuku-tyylinen lettikampaus. Myös hieman Frozen inspiroitunut kampaus. Annan keskikesän juhlalookki. :D

Tykkäättekö stailata peruukkeja tai tehdä muuten vaan kampauksia?


This reminds me a little bit of a folk and national costume styled braid hairdo. Also a bit like Frozen inspired hairdo. Anna's midsummer celebration look. :D

Do you like to style wigs or do hairdos anyways?


❤~ Saija Sasetar


Tuesday, May 3, 2016

Easy kawaii lolita eye makeup tutorial ♡


Moi murut ♡
Tämä on todella helppo perus silmämeikki tutorial ohje söpön ja nukkemaisen lookin luomiseen. Se sopii moneen yleiseen japanilaiseen katumuoti tyyliin, kuten lolita, gyaru, decora ja fairykei. Erilaisilla väreillä voi luoda monia variaatioita ja tummempia tyylejä.

Hi dearies ♡
This is a very easy basic eye makeup tutorial to create a cute and doll style look. It goes very well with many common Japanese street fashion styles, like lolita, gyaru, decora and fairykei. With different colors you can create many variations and darker styles.


Näitä tarvitset:

  • vaaleanpunainen luomivärikynä
  • vaaleanpunainen, musta ja valkoinen luomiväri
  • nestemäinen rajauskynä
  • irtoripset
  • ripsiväri
  • ruskea rajauskynä
  • ruskea varjostus ja pinkki poskipuna
  • pinkki huulipuna ja huulikiilto
  • (värilliset laajentavat piilolinssit)


You'll need these:


  • pink shadow liner
  • pink, black and white eyeshadow
  • liquid eyeliner
  • mascara
  • brown liner pencil
  • brown contour and pink blush
  • pink lipstick and lip gloss
  • (colored enlarging circle lenses)


1. Laita silmiin piilolinssit noudattaen pakkauksen ohjeita. Ennen käyttöä varaa aika paikalliselle silmälääkärille/optikolle varmistaaksesi, että voit käyttää niitä. Ilman piilareita käy myös hyvin.

1. Put on circle lenses by following the package instructions. Before using visit your local eyedoctor/optician to make sure you can use them. Without lenses is fine as well. 

 2. Levitä vaaleanpunaista luomivärikynää yläluomelle.
2. Apply pink shadow liner to upper eyelid.

3. Käytä vaaleanpunaista luomiväriä luomivaon yläpuolelle, sekä alaluomelle.
3. Use pink eye shadow for above crease and lower lashline.

 4. Lisää mustaa luomiväriä silmäluomien ulkonurkkaan.
4. Add black eye shadow to outer corner of the eyelids. 

 5. Käytä valkoista luomiväriä kulmaluun päälle korostamaan.
5. Use white eye shadow on top of brow bone to highlight.

 6. Käytä samaa valkoista lajaalti silmän sisänurkkaan.
6. Use the same white widely on the inner corner of the eye.

7. Tee silmänrajaus aloittaen sisännurkasta ja paksuunna kohti silmän ulkonurkkaa.
7. Apply the eyeliner starting from inner corner and thickening the line towards the outer corner.

 8. Tee pieni rajaus ulkonurkan alapuolelle ja kaareva kärki yhdistämään molemmat puolet.
8. Make a short line on outer lower lash line and a winged tip to connect both sides.

9. Leikkaa ripset kahteen osaan - käytää liimaa ja lisää yläluomen ripsen tyveen aloittaen ulkonurkasta. Käytä pinsettejä, se on helpompaa. Lisää sisänurkasta leikattu osa alaluomen ulkonurkkaan.
9. Cut the lashes into two pieces - add glue and apply to upper eyelid next to the lash line starting from the outer corner. Use tweezers, it's easier. Apply the cutted piece to outer corner of lower lash line.

10. Lisää ripsiväriä molemmille puolille. Tykkään tehdä tämän tässä järjsestyksessä, koska tekoripset naamioituvat omien taakse paremmin.
10. Add mascara on both sides. I like doing this in this particular order, because it blends the false lashes behind your own ones better.

11. Käytä ruskeaa tai tummaa varjostusväriä kulmakarvojen väritykseen.
11. Use brown or dark contour shade to color the eyebrows. 

12. Piirrä kevyesti ruskealla rajauskynällä määrittämään lisää kulmakarvan linjaa.
12. Draw lightly with a brown liner to define the eye brown line even more.

13. Viimeistele pinkillä poskipunalla, huulipunalla ja huulikiillolla.
13. Finish up with pink blush, lipstick and lip gloss.


Valmis!      All done!


|  Hair: Gothic Lolita Wigs  |
|  Wing hairclips:  Talking to Myself  |
|  Circle lenses:  Geo Heart Pink   |
|  Name Necklace:  Di Depux  |


Tein tän silmämeikki ohjeistuksen yhtä projektia varten jo jonkin aikaa sitten, mutta koska se ei sitten loppujen lopuksi koskaan toteutunut halusin jakaa tämän teille. Tiedän että lukijoissa voi olla monia kenelle tästä olisi hyöytä ja toivottavasti on! ♡ ♡

I made this eye makeup tutorial for this one project some time ago, but because in the end it never actually came to be I wanted to share this with you. I know many there can be many readers who could find this useful and hopefully there are! ♡ ♡


❤~ Saija Sasetar


Wednesday, August 19, 2015

Kuinka tehdä itse yrttiteetä ~ How to make herbal tea


Moi ihanaiset ♥
Koska olen tämmönen luontohöpö ja keräilen myös hyödykkeitä ulkosalta, ajattelin jakaa teille pienen helpon ohjeen, miten saa itsekin hyvää yrttiteetä tai no oikeastaan yrttihauduketta! :)

Monenlaisia yrttejä voi käyttää haudukkeena, niillä on myös lääkinnällisiä vaikutuksia ja voi helposti hoitaa esimerkiksi flunssaa. On kuitenkin tiedettävä mitä yrttejä kerää ja kuinka paljon niitä kannattaa käyttää. Tässä muutamia yleisohjeita keruuseen:


  • kerää vain kasveja mitä tunnet
  • kerää sallituilta paikoilta, ei toisten pihasta
  • yrtit kerätään puhtaalta paikalta, ei tien vierestä, kävelytien varrelta tai lannoitetulta paikalta
  • kerää kuivalla säällä
  • älä kerää muovipussiin, kori, paperi- tai kangaspussi käy paremmin
  • vaihtele yrttejä, älä käytä samoja jatkuvasti
  • ole tietoinen, että jotkut kasvit saattavat aiheuttaa allergisen reaktion
  • koskaan ei kerätä kaikkia kukkia, lehtiä tai kasveja samasta paikasta, että se kasvaa myöhemminkin!

Hi lovelies ♥
Because I'm such a nature goofball and collecting also commodities from outside, thought I'd share you an easy guide on how to get good herbal tea yourself as well, though it's actually herbal infusion! :)

Many herbs can be used in infusion, they also have medicinal purposes and can easily treat flu for example. It has to be known what herbs will be picking up and how much should use them. Here's some general advice for collecting:

  • only collect herbs you know
  • gather from allowed areas, not from someone's yard
  • herbs are gathered from a clean place, not the side of the road, next to a walkway or from fertilized place
  • collect on a dry weather
  • don't gather to a plastic bag, a basket, paper- or a cloth bag is better
  • change the herbs, don't use the sames all the time
  • be aware, that some plants can cause an allergic reaction
  • never collect all the flowers, leaves or plants from the same area, so that they will grow next later too!


Tehdään muutaman yrtin sekoitus, eiköhän siis aloiteta~
We'll do a mix of a few herbs, so let's get started~

1. Rubus Idaeus

Vadelma | Raspberry

Tämä on villi vadelma ja siitä käytetään lehtiä. Kerätään puhtaita ja terveitä lehtiä ensimmäisen vuoden kasvustoista, eli sellaisista, mitkä eivät tee marjoja ja varsi on vihreä ja notkea. Vadelman tunnistaa helposti lehden alapinnan valkoisuudesta. Toinen jolla on vaalea alapinta, tosin myös hieman kiiltävä, on taikinamarja, mutta sillä on täysin erimallinen lehti.

Tätä kerätään paljon, se on teesekoituksen pohja!

This is wild raspberry and we'll use the leaves. Collect clean and healthy leaves from first year growths, which are those that don't make berries and the stem is green and flexible. Raspberry is easily recognized by the whiteness of the leave's underside. The other kind of plant that has light leaf underside, is mountain currant, but the leaves are totally different. 

This we'll collect lots, it's the base of the tea-mix!


2. Trifolium Repens

Valkoapila | White Clover

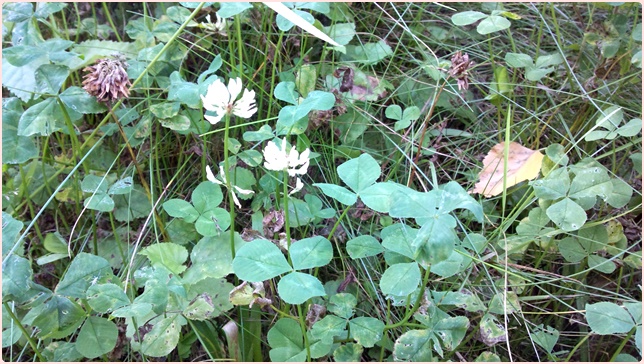
Hyvin yleinen kukka, mutta ei silti kerätä ihan siitä koirapolun varrelta. Tästä käytetään kukkia. Apiloita on montaa erilaista ja ne on helppo sekottaa keskenään. Valkoapilan tunnistaa kukan vaaleasta sävystä ja kasvutavasta! Ylhäällä on vasemmalla valkoapila, missä lehti ja kukka kasvaa erikseen maasta. Ylhäällä oikealla taas on alsikeapila, joka on muuten samannäköinen, mutta varsi haarautuu. Alhaalla myös metsäapila, sen näköistä kannattaa kerätä, kun lehdissä on vaalea rinkula, se on silloin puna-apila.

Very common flower, but don't collect beside the dog walking path. From this one we'll use flowers. There are many types of clovers and they are easily mixed up. White clover can be recognized by the light color and how it grows! Above on the left is white clover, where the leaf and the flower grow separately from the ground. Above on the right is alsike clover, which looks the same, but the ramifies, makes branches. Below there's also zigzag clover, that kind of looking plant is good to pick up, when it has light circles on it's leaves, then it's red clover.


3. Achillea Millefolium

Siankärsämö | Yarrow

Siankärsämö on nokkosen jälkeen ihan parhaita kasveja ominaisuuksiltaan! Sen maku on vahva, mutta sitä kannattaa laittaa aina pikkuisen teesekoituksiin, sillä se auttaa vähän kaikkeen. Tästäkin kerätään kukkia. Kasvi on jämäkkä, hieman tahmainen ja sormet voi vähän töhriintyä, mutta se ei haittaa. Kukassa on todella voimakas tuoksu. Tätä ei tarvitse paljoa, mutta sitä kannattaa olla jemmassa, koska sitä voi vaikka lisätä enemmän teehen, kun on kipeänä. Lehti on aika pienehkö, ehkä karvaisen tuntuinen.

(Mulla ei ollu mitään pussia ku hain tyttöö päiväkodista, joten käytin hänen tuubihuivista tehtyä pussukkaa.)

After nettle, yarrow is one of the best plants by it's qualities (in Finland)! The taste is strong, but it's recommendable to always put it a little bit to tea blends, because it works almost to anything. From it we'll also collecting flowers. The plant is sturdy, a bit sticky and fingers might get a bit smudgy, but it's ok. The flower has a really strong scent. You don't need much of it, but it's good to have it around, because you can increase the amount in the tea, when being sick. The leaf is quite small-ish, maybe feels a bit hairy.

(I didn't have any bag with me when getting my daughter from daycare, so used her tube-scarf to make a pouch.)


4. Calluna Vulgaris

Kanerva | Common Heather

Kanervaa kasvaa ihanissa mäntymetsissä ja tästä otetaan kukkia ja kukkivia latvuksia. Muistaa taas ettei kerätä kaikkea! Tätäkään ei tarvita ihan hirmuisen paljon, mutta se tuo omat vibansa ja vaikutuksensa teehen. Pieni pörröinen puska metsässä, jossa on vaaleanpuna-violetteja pienen pieniä kukkia.

Common heather grows in lovely pine woods and from this we'll use flowers and flowering tops. Remember again not to collect all! With this one too, we don't need that much, but it'll give it's own vibes and effects to the tea. Little fluffy bush in the woods, where grows pink-purple tiny flowers.


Kun pääset kotiin~
When you get home~


Levitä kukat ja lehdet sanomalehdelle, tarjottimelle tai käytä kuivuria, jos sinulla sellainen on. Kääntele vaikka kerran päivässä, että varmasti kuivuu. Kuivaan itse yrtit erikseen ja laitan purkkiin, koska sekoittelen aina fiiliksen mukaan omat teeni suoraan haudutuspannuun. Suosittelen tekemään myös näin, koska eri kasvit menevät kuivuessaan erilaiseen kokoon, voit kuitenkin tehdä myöhemmin valmiiksi sekoituksen ja käyttää siitä suoraan.

(keräsin tällä kertää pääasiassa siankärsämöä, koska sitä tulee käytettyä ja muuta mulla onkin jo aika hyvin)

Spread the flowers and leaves on top of a newspaper, tray or use a dryer if you have one. Turn over them perhaps once a day, so they will dry out. I dry my herbs separately and put the in a jar, because I'm always mixing my blends according to my current feeling straight to the teapot. Recommending you'll do this way too, because different plants go into different size when dried up, you can still finish up your blend later and use that.

(this time mostly collected yarrow, because using it a lot and right now got plenty of the others)


Valmiina käytettäväksi yrttihaudukkeeseen..mmm~
Suosittelen käyttämään tällaista suhdetta teesekoitukselle:

Ready to be used in an herbal infusion..mmm~
Recommending to use this kind of porportions for the blend:

Vadelma | Raspberry  ❀ ❀ ❀ ❀ ❀
Valkoapila | White clover  ❀ ❀ ❀
Kanerva | Common heather  ❀ tai / or ❀ ❀
Siankärsämö | Yarrow  ❀


Jonkin verran yrttisatoa loppukesältä, vielä pitäisi kerätä paljon, kun kerran luontoäiti tarjoaa. :)

Some of my harvest from the end of the summer, should still gather, when mother nature is giving. :)

❤~Saija Sasetar

psst..teille jotka mietitte onko tämä nyt tästä lähtien joku hippi- tai goottiblogi, niin vastaus on ei. Tämä on blogi, jossa käsittelen edelleenkin kaikkea kivaa mistä tykkään ja varmasti tulee olemaan kaikkea söpöä ja pinkkiä! Tykänny pienestä asti, joten en varmasti nytkään siitä luovu! 

psst..for those of you who are wondering if this is now going to be some hippie or goth blog, the answer is no. This is a blog, where I post about all kind of fun stuff I like and there will certainly be all things cute and pink! Liked them since little, so not giving them up now either!